How to deploy MYSQL on Google Compute Engine
How
to Setup MY-SQL using GCP VM Instance
In
this, I have shown a way to setup MySQL in Google cloud.
1. GCP Setup
Create new Project (If already created
Skip this).

Create project: 1.1
Go to Compute Engine select “Create new
Instance”.

2. Configuration of VM instance (Used
as per Google free Trail)
1. Give a Name for instance.
2.
Select Region
and Zone ( used as per free trail in this, u can change as per need)
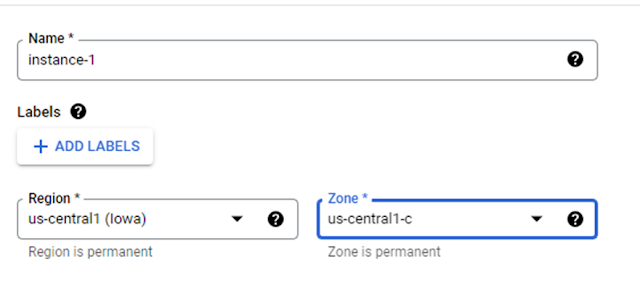
Region and zone selection: 1.2
3) Select Machine Configuration

Machine Configuration: 1.3
4) Change
boot disk (if u need) in my case I’m changing into to Ubuntu.

Boot disk selection 1.4

Selected Boot disk 1.5
5) Change the access Scope to “allow full access to all cloud APIs” and
allow HTTP and HTTPs traffic.

Access scope and firewall 1.5
6) Create
instance
3. Setting up
Firewall
Follow below steps to create
Firewall:
- Go to firewall (search on
Search bar )
- Create Firewall
Rule.
- Create Tag
name(any) in my Case I created as “instaceruletag”
- In source IPV4
ranges change to 0.0.0.0/0. And In Protocol and Ports to TCP 3306
- Note down
firewall name “instaceruletag”
- Create rule.
1)
Go to firewall:

Firewall: 1.6
2)
Create Firewall Rule:

Create Firewall: 1.7
3) Create firewall and Tag name (any) in my Case I created as “instaceruletag”:

Create firewall Name: 1.8

4) In source IPV4 ranges change to
0.0.0.0/0. And In Protocol and Ports to TCP 3306

Change Ipv4: 1.9
5) Note down tag name and paste that in VM instance
network tag.
·
Edit VM instance.

Click
on Instance: 2.0

Edit instance: 2.1
·
Then under network tag add
firewall tag add firewall tag we created.

·
Save
·
verify
Firewall applied or not by firewall -> fire wall name(what we created ) in
my case

4. Install My-SQL In Virtual Machine(VM)
I took reference of installation https://www.digitalocean.com/community/tutorials/how-to-install-mysql-on-ubuntu-20-04
1) Click on SSH

2) Follow commands
To install it, update the package index on your server if you’ve
not done so recently:
sudo apt update
Then install the mysql-server package:
sudo apt install mysql-server
Ensure that the server is running
using the systemctl start command:
sudo systemctl start mysql.service
Check mysql is installed
or not by
mysql --version
Note:These
commands will install and start MySQL, but will not prompt you to set a
password or make any other configuration changes. Because this leaves your
installation of MySQL insecure, we will address this next.
5. Configure My-SQL
First, open up the MySQL prompt:
sudo mysql
Then run the following ALTER USER command to change the root user’s authentication method to one that uses a
password. The following example changes the authentication method to mysql_native_password:
ALTER USER 'root'@'localhost'
IDENTIFIED WITH mysql_native_password BY 'password';
After making this change, exit the MySQL
prompt:
exit
Once the security script completes, you can
then reopen MySQL and change the root user’s authentication method back to the default, auth_socket. To authenticate as the root MySQL user using a password, run this command:
mysql -u root -p
Then go back to using the default
authentication method using this command:
ALTER USER 'root'@'localhost'
IDENTIFIED WITH auth_socket;
This will
mean that you can once again connect to MySQL as your root user using the sudo mysql command.
6. Change the configuration file to
create remote user
Command for configuring mysqld.cnf file.
sudo nano /etc/mysql/mysql.conf.d/mysqld.cnf
In that Change bind address to
0.0.0.0 (because not to block any ip)

Save by Ctrl-x and save as Y
7. Remote user creation
CREATE USER 'myuser'@'localhost'
IDENTIFIED BY 'mypass';
CREATE USER 'myuser'@'%' IDENTIFIED BY 'mypass'
GRANT ALL ON *.* TO 'myuser'@'localhost';
GRANT ALL ON *.* TO 'myuser'@'%';
FLUSH PRIVILEGES;
Restart
MySQL
sudo service mysql restart
8. Connect into My-SQL workbench
1) Copy instance external IP.

2)
Go to
My-SQL workbench in local system.
a) Enter connection name (as per
your wish)
b) Enter IP address in Hostname
(instance IP)
c) Enter user name and password
d) Test connection then ok

e)
MySQL
IS finally ready to use
Comments
Post a Comment